by Kappy Prasad | Feb 9, 2015 | Articles, Blog, Linux, Technical
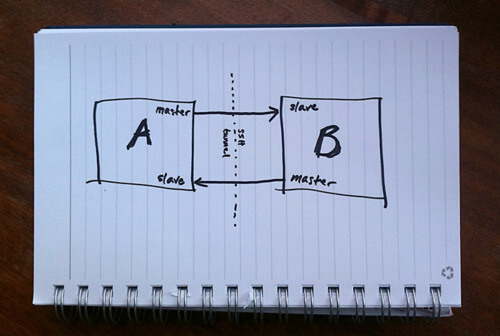
MySQL Replication is incredibly simple to get up and running and this post will instruct you through it. Simple Master -> Slave Replication MySQL allows you to build up complex replication hierarchies, such as multi-master, chains of read slaves, backup databases at a remote site or any combination of these. This article focuses on a simple single master to single slave setup. This article also assumes that 2 MySQL Servers have been installed but that there is no existing data in the master that needs to be copied to the slave – it’s not complex to add that extra requirement and it will be covered in a future post. Server “masterhost” (192.168.0.31) is to be our master and “slavehost” (192.168.0.34) the slave. Step 1: Edit the configuration files & start the MySQL Servers The first step in setting up replication involves editing the “my.cnf” file on the servers that will serve as the master and slave. A default is provided with the MySQL installation but in case there is already a production MySQL database running on these servers, we provide local configuration files “master.cnf” and “slave.cnf” that will be used when starting up the MySQL servers. At a minimum we’ll want to add two options to the [mysqld] section of the master.cnf file: log-bin: in this example we choose inodecloud-bin.log server-id: in this example we choose 1. The server cannot act as a replication master unless binary logging is enabled. The server_id variable must be a positive integer value between 1 to 2^32 master.cnf: [mysqld] server-id=1 log-bin=black-bin.log datadir=/home/inode/mysql/master/data innodb_flush_log_at_trx_commit=1 sync_binlog=1 Note: For the greatest possible durability and consistency in...
by Kappy Prasad | Sep 26, 2014 | Articles, Blog, Linux, News, Technical
Yesterday we swiftly patched all of our customers web servers due to a critical vulnerability to Bash, aka the Bourne-Again Shell. but what damage could this vulnerability do? The flaw involves how Bash evaluates environment variables. With specifically crafted variables, a hacker could use this hole to execute shell commands. This, in turn, could render a server vulnerable to ever greater assaults. By itself, this is one of those security holes where an attacker would already need to have a high level of system access to cause damage. Unfortunately, as Red Hat’s security team put it, “Certain services and applications allow remote unauthenticated attackers to provide environment variables, allowing them to exploit this issue.” The root of the problem is that Bash is frequently used as the system shell. Thus, if an application calls a Bash shell command via web HTTP or a Common-Gateway Interface (CGI) in a way that allows a user to insert data, the web server could be hacked. As Andy Ellis, the Chief Security Officer of Akamai Technologies, wrote: “This vulnerability may affect many applications that evaluate user input, and call other applications via a shell.” That could be a lot of web applications — including many of yours. The consequences of an attacker successfully exploiting this vulnerability on a Web server are serious in nature. For example attackers may have the ability to dump password files or download malware on to infected computers. Once inside the victim’s firewall, the attackers could then compromise and infect other computers on the network. Aside from Web servers, other vulnerable devices include Linux-based routers that have a Web interface...

by Kappy Prasad | Jul 10, 2014 | Linux, Technical
When you ask most people how do you transfer or migrate your site over the common answer is “oh i use Filezilla and download to my local drive then upload to the new directory”. This is not really the easiest way to migrate but a two step process of downloading the uploading, what if you had to transfer lets say a 200Gb site over. This was the case with our partner Mindarc who is a Digital Agency that looks after some high profile Ecommerce Websites and their client A Learning Place who is hosted on our cloud. Me being lazy and looking for the easiest way to do something i suggest using this command line to do a DIRECT Site to Site transfer just from terminal from Mac or Linux or use Putty if you are using Windows. Open up a terminal and enter this: scp -rp SSHUSERNAME@IP:<DIRECTORY OF SOURCE> SSHUSERNAME@IP:<DIRECTORY OF DESTINATION> Now lets dissect and see what the heck this means. SCP – Secure copy is a means of securely transferring computer files between a local host and a remote host or between two remote hosts -r parameter – known as recursive, sometimes we need to copy the directory of all the files inside. -p parameter – Provides modification times, access times, and modes from original files The first SSHUSERNAME@IP:<DIRECTORY OF SOURCE> is the SSH connection username and where the originating files are located so for example it would be something like this: root@192.168.1.23:/var/www/public_html/ The second section is where is the remote server where the files are going and which directory will it be placed under, for example: root@102.203.122.124:/var/www/user/html/website/ So the complete command looks something like...